Wax On Wax Off - Deploying Dataflows on AWS with GitHub Actions
By Esteban Miccio & Zander Matheson

We will get to the tutorial on getting your dataflow production ready and deploying it to AWS with GitHub Actions, but first, a bit about why we built Waxctl, and what it is.
Waxctl is the Bytewax command line interface that simplifies deployment and management of Bytewax dataflows. We built Waxctl to provide an interface that would mirror the experience that cloud or serverless platforms provide, but with your resources and your data staying within your network. We are still early on this vision, but it is core to the mission of Bytewax, which is to simplify development on streaming data. The decision to build a peripheral tool set around the core open source project instead of building a hosted version was a particularly important decision for us since we wanted our users to have complete control and feel at ease while running workflows that process sensitive data. With today’s virtualization technology, IaaS options and DevOps tooling, it's possible to build a user experience where you can focus on writing the code that matters (your dataflows) and not on how to configure instances and integrate with a myriad of devops tools. If you still want a more managed service where everything is managed, please contact us. Let’s get on with how to use Waxctl!
So you have written an awesome dataflow. Something that is revolutionary and now you need to run it on something that is not your laptop :). Waxctl is here to help. In this post, we are going to walk you through how you can turn your local dataflow into something ready for production with test and that can be automatically deployed to one of the public clouds. This is meant for smaller deployments that are not using Kubernetes, if you are using Kubernetes, please check out our documentation on how to use Waxctl with Kubernetes.
For the purposes of this tutorial, we are going to build upon some code from a prior blog post that streams events from wikimedia SSE stream. The code referenced in the rest of the post can be found in the waxctl-aws Repository
Writing and Running some tests
Working within the context of a data stream can be difficult because the data is always changing, it is helpful to take a sample of your data and use that when you are developing locally and testing the dataflow. To modify an existing dataflow to use a test set of data we will add/modify the following lines.
# dataflow.py
from bytewax.recovery import SqliteRecoveryConfig
from bytewax.window import SystemClockConfig, TumblingWindowConfig

+ ENVIRONMENT = os.getenv("ENVIRONMENT", None)
…
…
flow = Dataflow()
- flow.input("inp", ManualInputConfig(input_builder))
+ if ENVIRONMENT in ["TEST", "DEV"]:
+     with open("test_data.txt") as f:
+         inp = f.read().splitlines()
+     flow.input("inp", TestingInputConfig(inp))
+ else:
+     flow.input("inp", ManualInputConfig(input_builder))
flow.map(json.loads)
flow.map(initial_count)
Now when we run our code the TEST or DEV set as the environment variable named Environment we will use our test_data as input instead of consuming from the SSE stream. This will make it easier to work on code changes locally, and we can go one step further with this and write some tests that will run with pytest. :ninja:
Let’s take a peak at how we can run our dataflow as a test.
from dataflow import flow
from bytewax.execution import run_main
from bytewax.outputs import TestingOutputConfig


def test_dataflow():
    out = []
    flow.capture(TestingOutputConfig(out))
    run_main(flow)
    data = [
            ('commons.wikimedia.org', 1),
            ('ca.wikipedia.org', 1),
            ('species.wikimedia.org', 1),
            ('en.wikipedia.org', 2),
            ('ar.wikipedia.org', 1),
            ('fr.wikipedia.org', 1),
            ('id.wikipedia.org', 9),
            ('www.wikidata.org', 15),
            ('ro.wikipedia.org', 1),
        ]
    assert sorted(out) == sorted(data)
With very little additional code, we were able to add a test that we can run on each code change to ensure the dataflow is still running correctly. For the additions we made to our dataflow and our new test file, we are leveraging the TestingInputConfig and TestOutputConfig helpers.
Now that we have our code running locally, let’s look at how we can setup some GitHub Action Workflows to test our code. This will ensure that our code won’t break with any additional changes. To add an Actions workflow, we will add a new YAML file in the .github/workflows/ directory with the following code.
name: Python Tests

on: [push]

jobs:
  build:
    runs-on: ubuntu-latest
    strategy:
      matrix:
        python-version: ["3.9", "3.10"]

    steps:
      - uses: actions/checkout@v3
      - name: Set up Python ${{ matrix.python-version }}
        uses: actions/setup-python@v4
        with:
          python-version: ${{ matrix.python-version }}
      - name: Install dependencies
        run: |
          python -m pip install --upgrade pip
          pip install flake8 pytest
          if [ -f requirements.txt ]; then pip install -r requirements.txt; fi
      - name: Lint with flake8
        run: |
          # stop the build if there are Python syntax errors or undefined names
          flake8 . --count --select=E9,F63,F7,F82 --show-source --statistics
          # exit-zero treats all errors as warnings. The GitHub editor is 127 chars wide
          flake8 . --count --exit-zero --max-complexity=10 --max-line-length=127 --statistics
      - name: Test with pytest
        run: |
          # add our TEST env var
          ENVIRONMENT=TEST pytest
This will test our dataflow with each new code change! Nice!
Next let’s look at how we can package our dataflow and run it on AWS EC2.
Automating Build and Deployment
We will use waxctl to get started here. Waxctl allows you to easily deploy and manage dataflows on kubernetes or on public cloud virtual machines like AWS EC2. For more details on waxctl, you can check out the long format docs on waxctl
If you use the Homebrew package manager you can install it with brew install waxctl. Otherwise, you can find the right installation binary on the bytewax website. Once completed, you can start managing your dataflows with Bytewax.
Since we are looking to automate this process after our tests pass. We are going to use GitHub actions again and Waxctl to deploy our dataflow.
To do so, we will do the following:
- Create the correct security credentials in AWS
- Set those credentials as secrets in our GitHub repository
- Write a workflow that will use Waxctl to deploy our dataflow
- Use Waxctl locally to check the status of our Dataflow
AWS Security Credentials
First we will need to create an iam user and then attach a narrow policy to that user before creating the access credentials.
aws iam create-user --user-name bytewax-actions
Create a policy for the user
cat << EOF > bytewax-policy.json
{
    "Version": "2012-10-17",
    "Statement": [
        {
            "Action": "ec2:*",
            "Resource": "*",
            "Effect": "Allow",
            "Condition": {
                "StringEquals": {
                    "ec2:Region": "us-east-2"
                }
            }
        },
        {
            "Effect": "Allow",
            "Action": [
                "iam:CreatePolicy",
                "iam:CreateInstanceProfile",
                "iam:CreateRole",
                "iam:AttachRolePolicy",
                "iam:CreatePolicyVersion",
                "iam:TagPolicy",
                "iam:TagRole",
                "iam:TagInstanceProfile",
                "iam:AddRoleToInstanceProfile",
                "iam:PassRole",
                "iam:RemoveRoleFromInstanceProfile",
                "iam:DeleteInstanceProfile",
                "iam:DetachRolePolicy",
                "iam:DeleteRole",
                "iam:DeletePolicy"
            ],
            "Resource": "*"
        }
    ]
}
EOF
A note on the above policy: The policy above has some permissions that you may not want to enable for something running in a GitHub action. Specifically those iam permissions. In which case you (or your administrator) should create a specific bytewax role with a limited policy attached to it and specify it in the waxctl command with the --principal-arn flag. This will limit the requirement of waxctl to create the role.
Continuing on, we can create the policy from the document created above.
aws iam create-policy --policy-name Bytewax --policy-document file://bytewax-policy.json
With the policy created, we will attach it to the user we created
export AWS_ACCOUNT_ID=$(aws sts get-caller-identity --query "Account" --output text)
aws iam attach-user-policy --policy-arn arn:aws:iam::$AWS_ACCOUNT_ID:policy/Bytewax --user-name bytewax-actions
With that done, we can create an aws secret access key and aws access key id:
aws iam create-access-key --user-name bytewax-actions | jq -r .AccessKey.SecretAccessKey
aws iam list-access-keys --user-name bytewax-actions --query "AccessKeyMetadata[0].AccessKeyId" --output text
And set those as secrets in our GitHub repository.
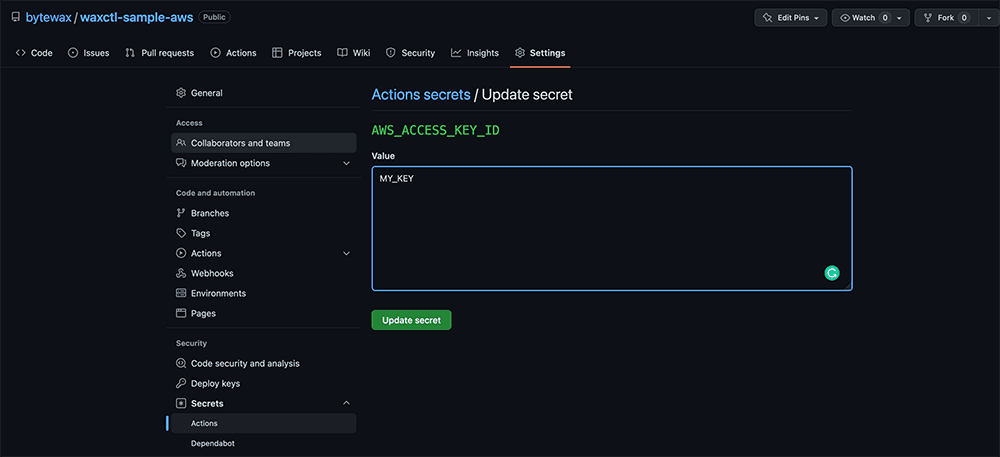
Now we have what we need to configure a deployment workflow that will run when a PR is closed and new code is merged into main.
name: Waxctl Deploy to AWS

on:
  workflow_dispatch:
    inputs:
      environment:
        description: 'Environment (staging or production)'
        required: true
        default: 'staging'
jobs:
  deploy:
    name: Deploy to EC2
    runs-on: ubuntu-latest
    permissions:
      id-token: write
      contents: read
    steps:
    - run: |
          echo "deployment on ${{ github.event.inputs.environment }}"
          echo "dataflow deployed: https://raw.githubusercontent.com/bytewax/waxctl-sample-aws/${{ github.sha }}/dataflow.py"
          echo "requirements used: https://raw.githubusercontent.com/bytewax/waxctl-sample-aws/${{ github.sha }}/requirements.txt"
    - name: Checkout
      uses: actions/checkout@v2

    - name: Configure AWS credentials
      uses: aws-actions/configure-aws-credentials@v1
      with:
        aws-access-key-id: ${{ secrets.AWS_ACCESS_KEY_ID }}
        aws-secret-access-key: ${{ secrets.AWS_SECRET_ACCESS_KEY }}
        aws-region: us-east-2

    - name: Install waxctl
      run: |
        eval "$(/home/linuxbrew/.linuxbrew/bin/brew shellenv)"
        brew tap bytewax/tap
        brew install waxctl
        mkdir ~/.waxctl
        echo "collect_telemetry: true" > ~/.waxctl/config.yaml

    - name: Waxctl Deploy
      run: |
        flow=$(/home/linuxbrew/.linuxbrew/bin/waxctl aws ls | grep wikievents | awk '{print $1;}')
        if [ "$flow" = "wikievents" ];
        then
          /home/linuxbrew/.linuxbrew/bin/waxctl aws delete --name wikievents --yes --debug
          while [ "$flow" = "wikievents" ]
          do
            flow=$(/home/linuxbrew/.linuxbrew/bin/waxctl aws ls | grep wikievents | awk '{print $1;}')
            sleep 2
          done
        fi;
        /home/linuxbrew/.linuxbrew/bin/waxctl aws deploy \
        https://raw.githubusercontent.com/bytewax/waxctl-sample-aws/${{ github.sha }}/dataflow.py \
        --requirements-file-name https://raw.githubusercontent.com/bytewax/waxctl-sample-aws/${{ github.sha }}/requirements.txt \
        --name wikievents \
        --debug
        sleep 5
        /home/linuxbrew/.linuxbrew/bin/waxctl aws ls --verbose
Walking through the workflow above, what we have done is setup the aws cli with our credentials for the bytewax user and then we have installed waxctl and used it to deploy our workflow. The logic above checks to see if the dataflow with the same name already exists and if it does, it will delete it and then recreate it. Otherwise it will create a new one. There are many other waxctl configurations for things like the type of the instance, security groups, and other advanced configurations. You can see the full list in the documentation.
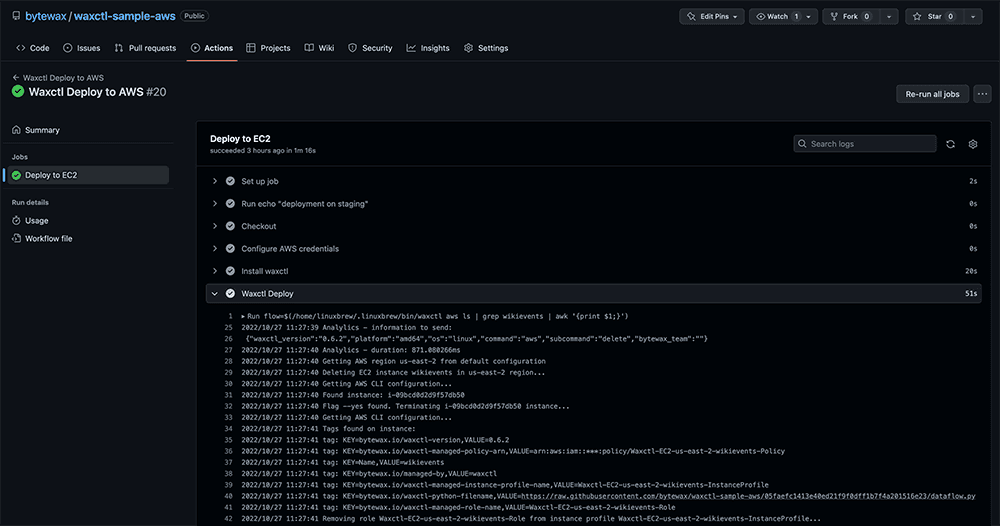
Now we can manually deploy our dataflow from the actions tab in our repo.
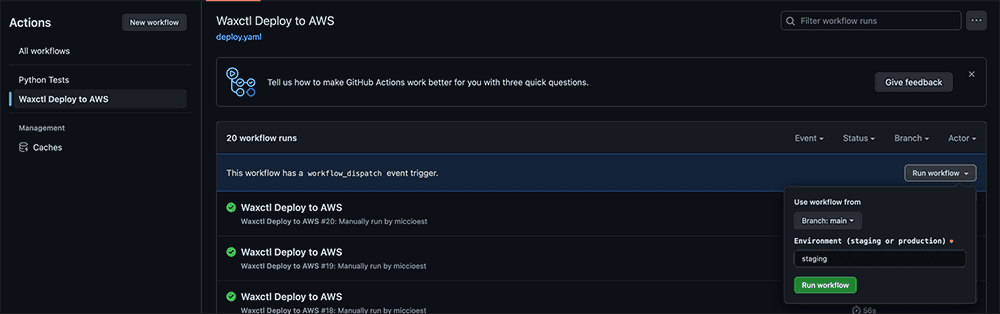
Upon successful deployment we can see the results in the actions tab for the workflow run.
Monitoring
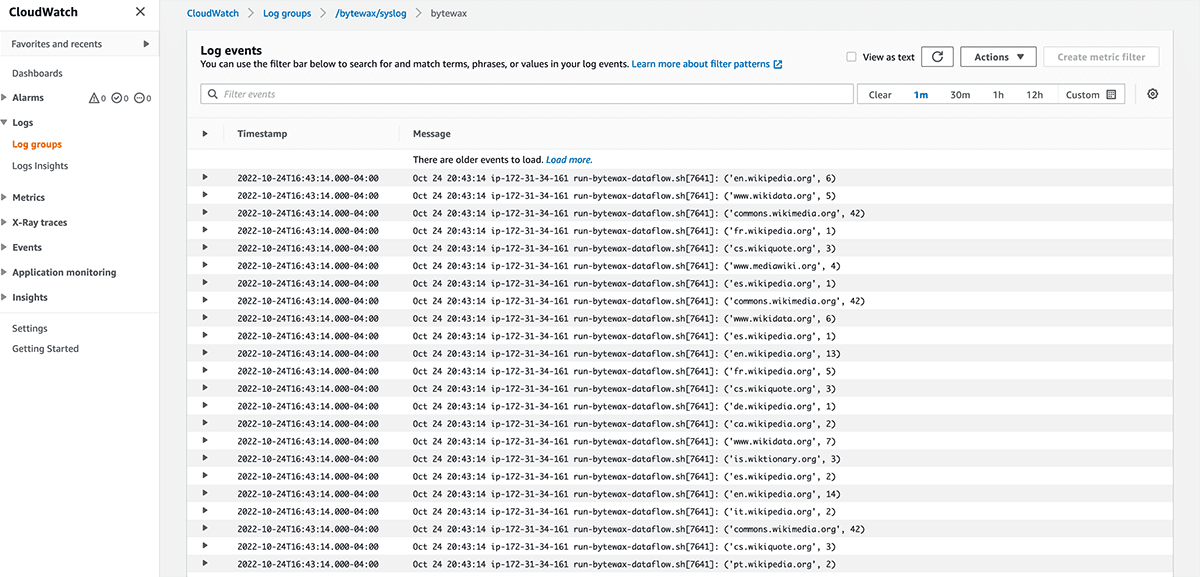
If you have cloudwatch enabled, you will automatically get access to the logs and metrics associated. To access the cloudwatch details of the dataflow we just started, run the following command:
waxctl aws ls --verbose
Scrolling down to the “logs” section you will find a URL. You need to be authenticated in your AWS management console, but once you are, you can simply click the link and see the cloudwatch logs for your instance.
"logs": "https://us-east-2.console.aws.amazon.com/cloudwatch/home?region=us-east-2#logsV2:log-groups/log-group/$252Fbytewax$252Fsyslog/log-events/wikievents$3FfilterPattern$3Dbytewax"
By clicking the link in your terminal or copying and pasting the URL in your browser, we can see the logs for our dataflow running in EC2.
That’s it, you are now running a dataflow on AWS EC2! Congratulations.
Give us a star if you liked this content.
Online Machine Learning for IoT

Esteban Miccio
Software & Infrastructure EngineerEsteban has worked in software development since 2002 in many companies and projects as a full-stack developer, architect, release engineer, and team leader. Passionate about DevSecOps, containers, cloud-native, and k8s, he is an AWS Certified Solution Architect, GCP Certified Professional Cloud Architect, and Certified Kubernetes Administrator.

Zander Matheson
CEO, FounderZander is a seasoned data engineer who has founded and currently helms Bytewax. Zander has worked in the data space since 2014 at Heroku, GitHub, and an NLP startup. Before that, he attended business school at the UT Austin and HEC Paris in Europe.