Real-time indexing dataflows: introducing the Azure AI Search Bytewax sink
By Laura Funderburk

Introduction
Earlier this year, Bytewax entered into a partnership with the teams at Unstructured and Microsoft as part of Microsoft's AI Co-Innovation Lab initiative, where our teams tackled the challenge of incorporating modern NLP techniques such as Retrieval Augmented Generation (RAG) with streaming. Our team focused on one of the key processes in RAG: the indexing pipeline.
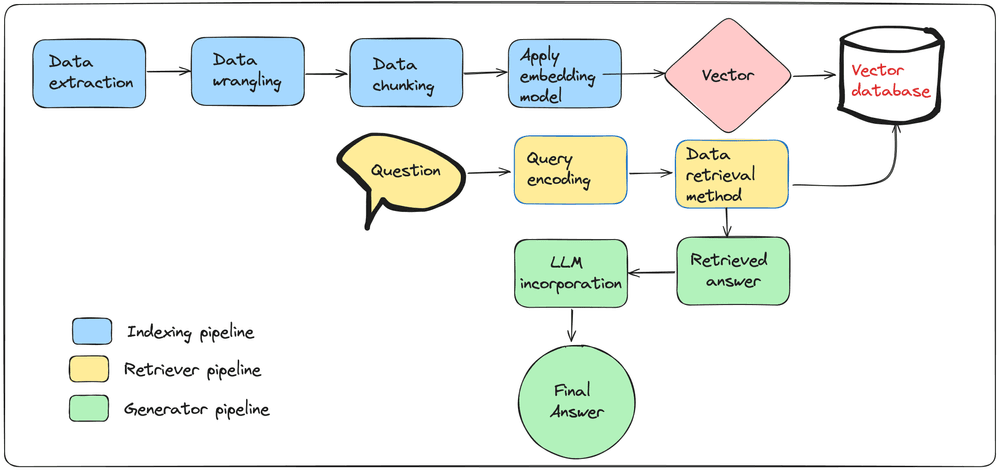
Indexing is a process focused on transforming raw data (typically text, but can also include images, webpages or content from PDF files) into vectors through the use of embedding models. Embedding models can convert text data into numerical vectors that capture the semantic meaning of the text. These vectors are then used to populate a vector database, enabling efficient retrieval based on semantic similarity.
This collaboration culminated in a free, virtual workshop and more recently the release of a sink that enables real-time vector database population on Azure AI Search services. This blog will show how to get started using the custom Azure AI Search sink.
How the Custom Sink Works
The Azure AI Search custom sink can be easily incorporated into a Bytewax dataflow. If you are new to creating and running Bytewax dataflows, check out our Streaming data for data scientists series.
Important: please ensure you create an Azure AI Search instance and relevant services, for more information and examples, you can refer to the README in the bytewax-azure-ai-search repository.
To install the custom sink you can run
pip install bytewax-azure-ai-search
Then import
from bytewax.bytewax_azure_ai_search import AzureSearchSink
You can then add it to your dataflow
def my_deserialize_function():
    """Function to deserialize JSONL entries"""
    pass

def my_indexing_process():
    """Function to apply indexing steps to entries"""
    pass

# Initialize sink
azure_sink = AzureSearchSink(
    azure_search_service=service_name,
    index_name="bytewax-index",
    search_api_version="2024-07-01",
    search_admin_key=api_key,
    schema={
        "id": {"type": "string", "default": None},
        "content": {"type": "string", "default": None},
        "meta": {"type": "string", "default": None},
        "vector": {"type": "collection", "item_type": "single", "default": []},
    },
)

# Initialize dataflow
flow = Dataflow("indexing-pipeline")
# Input data to read from JSONL
input_data = op.input("input", flow, FileSource("my_data.jsonl"))
# Deserialize to process each entry
deserialize_data = op.map("deserialize", input_data, my_deserialize_function)
# Apply indexing
extract_html = op.map("indexing", deserialize_data, my_indexing_process)
# Store vectors in the Azure AI Search instance
op.output("output", extract_html, azure_sink)
In the code above, we initialized the AzureSearchSink with the appropriate credentials and a schema. Through the custom sink, we can easily move from testing that the dataflow works to populating an Azure AI Search instance. Let's take a closer look at a complete example to showcase credential setup and schema definition with Python.
Setting Up a Simple Example
In this example, we will define a few data classes to simulate brief chunks of text.
Data simulation
The data classes are News, Review and Social, and they each contain three attributes:
id: uniquely identify the entrycategory: one of "news", "social", or "review"text: a headline
from dataclasses import dataclass
from datetime import datetime
from typing import List

@dataclass
class News:
    """Represents a news headline event.

    This class encapsulates the data for a news
    headline event, including the ID, category,
    and the news text.
    """

    id: str
    category: str
    text: str

@dataclass
class Review:
    """Represents a product review event.

    This class encapsulates the data for a product
    review event, including the ID, category,
    and the review text.
    """

    id: str
    category: str
    text: str

@dataclass
class Social:
    """Represents a social media post event.

    This class encapsulates the data for a social
    media post event, including the ID, category,
    and the post text.
    """

    id: str
    category: str
    text: str
We will leverage these attributes when we define our schema. Let's generate a few sample entries:
news_event_entries = [
    News(
        id="n1",
        category="news",
        text="Global markets rally on positive economic data."
    ),
    Review(
        id="r1",
        category="review",
        text="The camera quality of this phone is fantastic!",
    ),
    Social(
        id="s1",
        category="social",
        text="Just had the best coffee at this new place downtown.",
    ),
    News(
        id="n2",
        category="news",
        text="The election results are expected to be announced tomorrow.",
    ),
    Review(
        id="r2",
        category="review",
        text="Battery life could be better, but overall a decent phone.",
    ),
    Social(
        id="s2",
        category="social",
        text="Can't believe how beautiful the sunset was today!",
    ),
]
Our task is to build a Bytewax dataflow that will apply an embedding model, in this case an embedding model hosted on Azure OpenAI services, on the text field, generate a vector and store the vector in Azure AI Search through the custom sink. Let's define a schema that matches our data classes.
Defining a schema through the Azure AI Search Python API
Once all services have been initialized on the Azure portal, we can initialize an Azure AI Search client as follows:
import os
from dotenv import load_dotenv
from azure.core.credentials import AzureKeyCredential
from azure.search.documents.indexes import SearchIndexClient, SearchIndexerClient

load_dotenv(".env")

# Load environment variables
endpoint = os.getenv("AZURE_SEARCH_SERVICE_ENDPOINT")
service_name = os.getenv("AZURE_SEARCH_SERVICE")
api_key = os.getenv("AZURE_SEARCH_ADMIN_KEY")

# Set up Azure Credentials
credential = AzureKeyCredential(api_key)

# Initialize clients
index_client = SearchIndexClient(endpoint, credential)
search_indexer_client = SearchIndexerClient(endpoint, credential)
We will now create the schema. We will be making post requests containing JSON objects. We can initialize our schema such that the values match to the attributes in the data classes.
Below is the schema definition corresponding to our data classes:
# Define schema
fields = [
    SimpleField(
        name="id",
        type=SearchFieldDataType.String,
        searchable=True,
        filterable=True,
        sortable=True,
        facetable=True,
        key=True,
    ),
    SimpleField(
        name="category",
        type=SearchFieldDataType.String,
        searchable=True,
        filterable=True,
        sortable=True,
        facetable=True,
        key=False,
    ),
    SimpleField(
        name="text",
        type=SearchFieldDataType.String,
        searchable=True,
        filterable=True,
        sortable=True,
        facetable=True,
        key=False,
    ),
    SimpleField(
        name="vector",
        type=SearchFieldDataType.Collection(SearchFieldDataType.Double),
        searchable=False,
        filterable=False,
        sortable=False,
        facetable=False,
        vector_search_dimensions=DIMENSIONS,
        vector_search_profile_name="myHnswProfile",
    ),
]
The complete Azure AI Search schema configuration can be found in this script.
For the custom sink, we can match the definition of the schema as follows:
# Define the schema for the Azure Search index
schema = {
    "id": {"type": "string", "default": None},
    "category": {"type": "string", "default": None},
    "text": {"type": "string", "default": None},
    "vector": {"type": "collection", "item_type": "single", "default": []},
}

# Initialize the AzureSearchSink with the schema
azure_sink = AzureSearchSink(
    azure_search_service=service_name,
    index_name="bytewax-index-openai",
    search_api_version="2024-07-01",
    search_admin_key=api_key,
    schema=schema,
)
Where service name and api_key are environment variables corresponding to the information generated through the Azure portal.
Now, let's incorporate this information into a Bytewax dataflow.
Dataflow initialization with the custom sink
We can build a Bytewax dataflow using Python. The dataflow follows the following key steps:
- Initialize the dataflow.
- Take the simulation data as input.
- Apply an embedding function using a model hosted on Azure AI Search.
- Store the vectors generated in step 3 into our Azure AI search instance.
Let's take a look at the steps in more detail
Initialize the dataflow:
from bytewax.dataflow import Dataflow
from bytewax import operators as op
from bytewax.testing import TestingSource

# List of events
news_event_entries = [
    News(
        id="n1", category="news", text="Global markets rally on positive economic data."
    ),
    Review(
        id="r1",
        category="review",
        text="The camera quality of this phone is fantastic!",
    ),
    Social(
        id="s1",
        category="social",
        text="Just had the best coffee at this new place downtown.",
    ),
    News(
        id="n2",
        category="news",
        text="The election results are expected to be announced tomorrow.",
    ),
    Review(
        id="r2",
        category="review",
        text="Battery life could be better, but overall a decent phone.",
    ),
    Social(
        id="s2",
        category="social",
        text="Can't believe how beautiful the sunset was today!",
    ),
]

# Create and configure the Dataflow
flow = Dataflow("search_ctr")

# Input source for dataflow
inp = op.input("inp", flow, TestingSource(news_event_entries))
Through the Dataflow initialization and the input operator, we set up the dataflow so it takes our simulated news, social and review entries as input.
Each entry is then mapped as a single event:
# Mapping function to return each entry as an event
def news_event(event):
    return event

# Map the events to their ID and content
user_event_map = op.map("user_event", inp, news_event)
We can then initialize an Azure OpenAI Embedding model and apply the embedding model to the text.
load_dotenv(override=True)
import logging

# Configure logging
logging.basicConfig(level=logging.INFO)
logger = logging.getLogger(__name__)

endpoint = os.getenv("AZURE_SEARCH_SERVICE_ENDPOINT")
service_name = os.getenv("AZURE_SEARCH_SERVICE")
api_key = os.getenv("AZURE_SEARCH_ADMIN_KEY")
DIMENSIONS = 1536
AZURE_OPENAI_KEY = os.getenv("AZURE_OPENAI_API_KEY")
AZURE_OPENAI_SERVICE = os.getenv("AZURE_OPENAI_SERVICE")
AZURE_EMBEDDING_DEPLOYMENT_NAME = os.getenv("AZURE_EMBEDDING_DEPLOYMENT_NAME")
AZURE_EMBEDDING_MODEL_NAME = os.getenv("AZURE_EMBEDDING_MODEL_NAME")

# Initialize Azure OpenAI client
client = AzureOpenAI(
    api_key=AZURE_OPENAI_KEY,
    api_version="2023-10-01-preview",
    azure_endpoint=f"https://{AZURE_OPENAI_SERVICE}.openai.azure.com/",
)

# Function to generate embeddings and return the updated event
def generate_embeddings(event):
    try:
        # Generate the embedding for the event's text
        embedding_response = client.embeddings.create(
            input=event.text, model=AZURE_EMBEDDING_DEPLOYMENT_NAME
        )

        # Extract the embedding and ensure it's valid
        embedding = (
            embedding_response.data[0].embedding
            if embedding_response.data and embedding_response.data[0].embedding
            else [0.0] * DIMENSIONS
        )

        if len(embedding) != DIMENSIONS:
            raise ValueError(
                f"Invalid embedding size: expected {DIMENSIONS}, got {len(embedding)}"
            )

        event_dict = {
            "id": event.id,
            "category": event.category,
            "text": event.text,
            "vector": embedding,
        }

        return event_dict
    except Exception as e:
        logger.error(f"Failed to generate embeddings: {e}")
        return None

# Apply the embedding to each event's text
apply_embedding = op.map("apply_embedding", user_event_map, generate_embeddings)
In this case, the Bytewax map operator will apply the generate_embeddings function on each entry, generate a vector for the text entry, and return a dictionary that matches our schema definition.
Finally, to store the vectors in the Azure AI Search sink:
from bytewax.bytewax_azure_ai_search import AzureSearchSink

# Define the schema for the Azure Search index
schema = {
    "id": {"type": "string", "default": None},
    "category": {"type": "string", "default": None},
    "text": {"type": "string", "default": None},
    "vector": {"type": "collection", "item_type": "single", "default": []},
}

# Initialize the AzureSearchSink with the schema
azure_sink = AzureSearchSink(
    azure_search_service=service_name,
    index_name="bytewax-index-openai",
    search_api_version="2024-07-01",
    search_admin_key=api_key,
    schema=schema,
)

# Output the final events with embeddings
op.output("out", apply_embedding, azure_sink)
A complete dataflow Python file can be found here.
Conclusion
Integrating Bytewax with Azure AI Search through the custom sink offers a practical solution for enhancing their real-time indexing pipelines. By using this setup, we can efficiently process and index large volumes of data while taking advantage of advanced search capabilities, such as semantic search through embeddings.
For those managing their own indexing pipelines, this approach provides a flexible and scalable way to handle diverse data types, from news articles to social media posts. By using the Azure AI Search Bytewax sink, you can simplify the process of transforming raw data into searchable vectors, making it easier to build and maintain effective indexing systems.
Our team plans to incorporate more custom sinks and develop map operators focused on key NLP processes. We are excited about what the future holds!
Real-time data pipelines with Python: introducing the Bytewax cheatsheet

Laura Funderburk
Senior Developer AdvocateLaura Funderburk holds a B.Sc. in Mathematics from Simon Fraser University and has extensive work experience as a data scientist. She is passionate about leveraging open source for MLOps and DataOps and is dedicated to outreach and education.