
Why are we talking about Server-Sent Events (SSE)? We will go into this in more depth in this post, but SSE can be a great way to create a data stream that can be used for analysis, feature engineering, or reporting. In this first article, we will talk about how to use SSE to create a data stream in a Python web service. In subsequent articles, we will explore using an SSE stream with Bytewax as the stream processor.
An Overview of Server-Sent Events?
SSE is a web-based protocol to enable data communication that is often overlooked. From the HTML living standard:
To enable servers to push data to web pages over HTTP or using dedicated server-push protocols. 1
You may be familiar with polling websites for information or using WebSockets for bidirectional communication. SSE is like these as it is a method for communicating information between services, but it has some differences.
Websockets vs. SSE
SSE is similar to WebSockets, in that you can open a connection and receive data in a push basis, but unlike WebSockets, it is purely HTTP based and unidirectional and therefore does not impose the same overhead of establishing communication over another protocol. This has benefits for things like functioning well with corporate firewalls and integration with the existing stack. WebSockets is the protocol of choice for interactive services like games, chats, or similar, but if you need something where the flow of information is only in one direction, SSE is the right choice to maintain simplicity.
Polling vs SSE
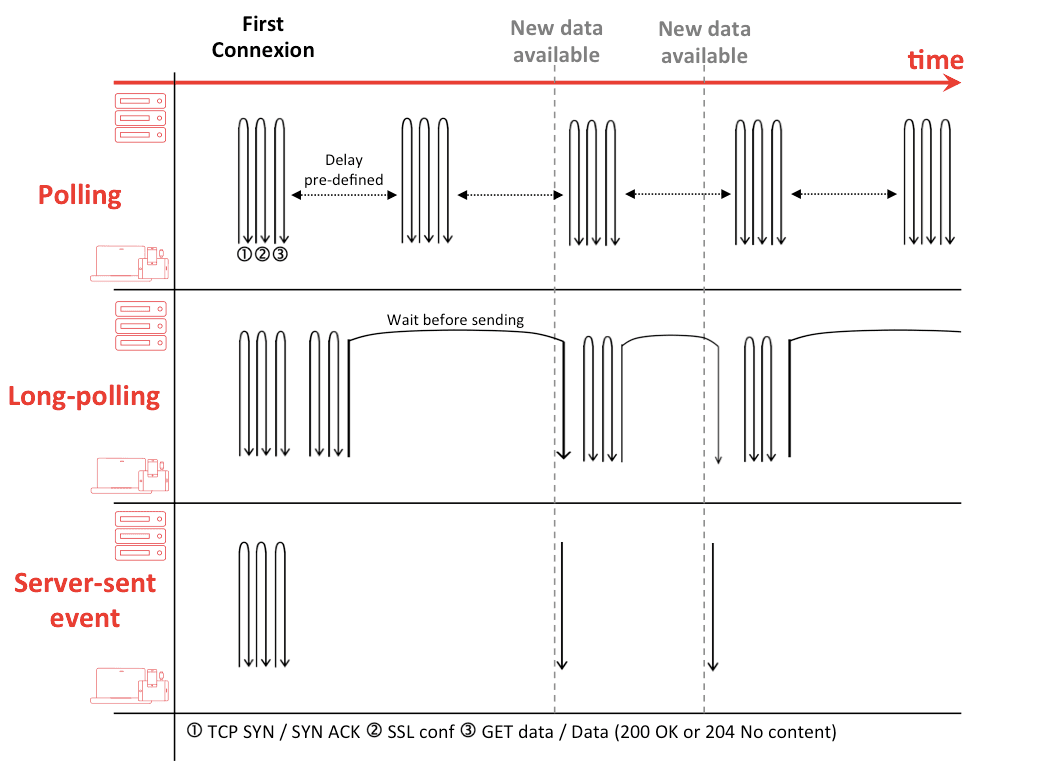
SSE based systems are more efficient and timely than poll-based systems. Once the connection is established, events are pushed to the client as soon as they are available. The diagram below outlines the differences between polling and SSE with regard to requests and data availability.
SSE Architecture
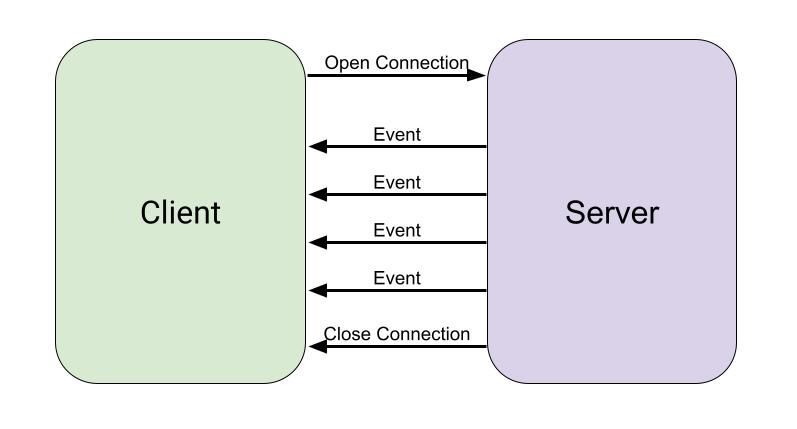
A web server will receive requests from a browser or other client and register them as Server-Sent Events. At some point, a different client will make a request to the Server via HTTP to start receiving events via the SSE protocol. The server can then stream events to the client. The connection to the server can be interrupted (due to an error), or closed by the server, in which case the client will reconnect.
Data Format
SSE is a simple stream of UTF-8 encoded text separated by newline characters. The specification includes the following fields:
Event: This is the event type, you can have multiple event types in a stream.
Data: This is the data field of the message
ID: An id for each message that can be used to track drop messages or perhaps out-of-order messages.
Retry: Amount of time in ms before retrying to connect to the stream. 3 seconds is the default.
How to use SSE with Python?
To get started streaming events in python we can create a simple flask application that can be subscribed to and that we can also ping to create events.
Want to skip to the code —> sse-demo repo
Building a small flask application
Let’s start with some Flask boilerplate that has an endpoint that we will use to mock some different actions taken within an app.
from flask import Flask

app = Flask(__name__)

@app.route("/event/<action>")
def event(action):
    return {}, 200
This code currently doesn’t do anything but return an empty response and a 200 status code 😄. That’s not very fun, so now we are going to build on this to make an application that will take our actions and create an event stream using SSE. For this implementation, we are going to leverage the Flask-SSE package to simplify development. This has a dependency on Redis, which is easy to install and run and we will be using Redis in another tutorial so having a little comfort with it goes a long way. To install and run Redis, please review the redis documentation.
Once your Redis service is started, we can continue building out our event stream. Below is the code for a very simple flask app that will write events to Redis. Those events will then be accessible as SSE events at the /stream endpoint, which we created with app.register_blueprint(sse, url_prefix='/stream'). To register events we are simulating an event endpoint that has the format event/<action> where the <action> can be used to simulate different types of events.
from uuid import uuid4
from datetime import datetime
import json

from flask import Flask
from flask_sse import sse

app = Flask(__name__)
app.config["REDIS_URL"] = "redis://localhost"
app.register_blueprint(sse, url_prefix='/stream')

@app.route('/event/<action>')
def event(action):
    user_id = uuid4()
    dateTimeObj = datetime.now()
    timestampStr = dateTimeObj.strftime("%d-%b-%Y (%H:%M:%S.%f)")
    sse.publish(data=json.dumps(f'user_id: {user_id}, timestamp: {timestampStr}'), type=action)
    return {}, 200
We can run our flask app using gunicorn so it is multi-threaded. This is required so that we can run flask, make requests and keep our stream connection open.
gunicorn app:app --worker-class gevent --bind 127.0.0.1:5000
Now that we have our Flask app running, we can make requests to the /event/<action> endpoint, which will register an event as an SSE using the flask-sse method publish. Let’s write a little helper code to write events to that endpoint in a file named events.py.
# events.py
import time
import random

import requests

if __name__ == '__main__':
    actions = ['view','click','close']

    while True:
        action = actions[random.randint(0,2)]
        answer = requests.get(f'http://127.0.0.1:5000/event/{action}')
        print(answer.status_code)
        time.sleep(1)
Now let’s create another python file, listen.py, that will subscribe to our stream and listen to new event data. We are using urllib3 to create a Poolmanager instance, which would allow us to send multiple HTTP requests, but in this case, we are only making one connection. As per the protocol definition, we send the type text/event-stream in the header. Our Flask app will return a stream to us, which is a generator that can be used as an iterable object to print out the events. The code below uses the python next() method to get the next item from the generator when it is available.
# listen.py
import json

import sseclient
import urllib3

def open_stream(url, headers):
    """Get a streaming response for the given event feed using urllib3."""
    http = urllib3.PoolManager()
    return http.request('GET', url, preload_content=False, headers=headers)

if __name__ == '__main__':
    url = 'http://127.0.0.1:5000/stream'
    headers = {'Accept': 'text/event-stream'}
    response = open_stream(url, headers)
    client = sseclient.SSEClient(response)
    stream = client.events()

    while True:
        event = next(stream)
        print(f"event: {event.event} \ndata: {event.data}")
Now opening our terminal we can run both of these files
> python events.py
200
200
200
> python listen.py
event: click
data: "user_id: 662509bb-f276-4b3e-816b-37f9d41fc891, timestamp: 08-Mar-2022 (12:30:56.760261)"
event: view
data: "user_id: 037714f4-43b9-4b00-afde-d4c7120b9978, timestamp: 08-Mar-2022 (12:30:57.771183)"
event: close
data: "user_id: 71633fe3-d796-4c2a-9909-40a5357165da, timestamp: 08-Mar-2022 (12:30:58.782063)"
This was a simple way to consume a stream of server sent events, for a more advanced example, consider checking out how you can use Bytewax, a Python stream processing library to stream from publicly available SSE endpoint like wikimedia.
That's It!

Want to see more of this content? Give us a follow on twitter and don't forget to ⭐ us on GitHub.
Want to join the growing Bytewax community? Join us in slack.