In earlier posts we have demonstrated how you can run Bytewax with multiple workers (threads) and with multiple processes. This is particularly helpful when scaling a workflow to meet the IO or CPU requirements. Without additional tooling to help manage running a workflow on multiple nodes, it can be quite difficult. In this post we will demonstrate how to run a dataflow on multiple processes in Kubernetes using a new tool we recently released called waxctl. waxctl is a command line tool that you can download from Bytewax.
Overview
We are going to run our k8s_cluster example in a Kubernetes cluster.
You can read more about how the Bytewax ecosystem works in Kubernetes in the Bytewax docs.
Getting Started
Let’s start by setting up a local Kubernetes cluster using Minikube.
Minikube is a tool that makes it easy to run Kubernetes locally. Minikube runs a single-node Kubernetes cluster inside a VM on your laptop.
Setup Minikube
You can follow Minikube's documentation to install it on your machine.
After the installation you need to start your cluster with the following command:
minikube start
It will take a few minutes for all of the resources to be provisioned. Once finished, you can check the status of your minikube cluster running this:
kubectl get nodes
Getting the k8s_cluster Example files from Bytewax Repository
We are going to use some example files from our GitHub repository. For simplicity we will clone the entire repository:
git clone git@github.com:bytewax/bytewax.git
We are going to use the following files:
├── examples
│   ├── k8s_cluster.py
│   └── sample_data
│       └── cluster
│           ├── partition-1.txt
│           ├── partition-2.txt
│           ├── partition-3.txt
│           ├── partition-4.txt
│           └── partition-5.txt
In order to deploy that tree of files/directories, we will need to create a single tarball file with the following command:
cd bytewax
tar -C ./ -cvf cluster.tar examples
In the tar output, you will see that the compressed file includes more directories and files than we listed before, that's OK.
Running your Dataflow on Minikube using Waxctl
We will deploy the Bytewax Kubernetes stack with the architecture shown below.
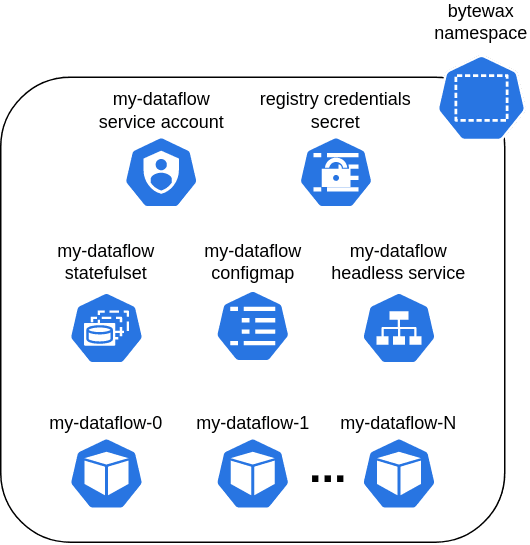
You can read more about it here if you are interested in how it works.
To deploy the resources in Minikube we use Waxctl, which is the Bytewax Command Line Interface. You can download the correct binary that corresponds to your operating system and architecture here. If you are using Linux you can run the following commands instead:
curl -LO https://downloads.bytewax.io/waxctl/0.1.2/waxctl_0.1.2_linux_amd64.tar.gz
tar -xvf waxctl_0.1.2_linux_amd64.tar.gz
sudo mv ./waxctl /usr/local/bin/waxctl
You can check if everything went well with the following command:
waxctl --version
You should see something like this (the version may have changed since this post):
waxctl version 0.1.2
Now we are going to deploy a dataflow using five processes in the current kubectl namespace which should be default.
To deploy the resources in Minikube with waxctl we can run the command below:
waxctl dataflow deploy ./cluster.tar \
  --name=k8s-cluster \
  --python-file-name=examples/k8s_cluster.py \
  --processes=5
You can add
--debugflag to every Waxctl command to get more details returned.
You should see the output:
Dataflow k8s-cluster deployed in default namespace.
That's it! You are running a Bytewax dataflow in Kubernetes running on five processes. In the next steps, we are going to see the output of the dataflow from each process.
Getting your Dataflow status in Kubernetes and its output
Now we can check your dataflow status with:
waxctl dataflow ls
You should see an output like the one below where processes and processesReady fields are equal to 5. It may take a bit for the processes to be ready:
[
  {
    "name": "k8s-cluster",
    "namespace": "bytewax",
    "containerImage": "bytewax/bytewax:latest",
    "containerImagePullSecret": "default-credentials",
    "pythonScriptFile": "/var/bytewax/examples/k8s_cluster.py",
    "processes": "5",
    "processesReady": "5",
    "workersPerProcess": "1",
    "creationTimestamp": "2022-04-11T17:11:34-03:00"
  }
]
Run that command until you see the processesReady field equal to 5.
In our example, each process generates an output file named ID.out where ID is the number of the process in the cluster.
To see the output of the process 0 you can run this command:
kubectl exec -it k8s-cluster-0 -cprocess -- cat /var/bytewax/cluster_out/0.out
This should be the output of that:
0 FIVE1
0 FIVE2
0 FIVE3
0 FIVE4
0 FIVE5
0 FIVE6
As you can see, we ran a cat command inside the process container of the k8s-cluster-0 pod.
We could modify this to run a one-line loop to see all outputs together:
for PROCESS in {0..4}; do echo "$PROCESS.out:"; kubectl exec -it k8s-cluster-$PROCESS -cprocess -- cat /var/bytewax/cluster_out/$PROCESS.out; done
You can use both Kubectl and Waxctl to interact with the resources deployed in Kubernetes, but you should use Waxctl to make changes to the dataflow configuration. You can read more about Waxctl in our documentation.
Cleaning up
To clean up the dataflow resources in your Kubernetes cluster you should run:
waxctl dataflow rm --name k8s-cluster --yes
You will see this message:
Dataflow k8s-cluster deleted.
Conclusion
In this post, we saw that Waxctl enables you to deploy multi-process Bytewax dataflows on Kubernetes by running a command. You can also modify the configuration, get the status or even remove the dataflow from the cluster using the same tool.
Thank you for reading this article! We also suggest you read more about Bytewax and containers in our Deployment section.

If you’ve enjoyed this article or have some feedback? Come join us on our Slack channel and give the repo a star!
Analyzing Crypto Order Books for Fun and for Profit

Esteban Miccio
Software & Infrastructure EngineerEsteban has worked in software development since 2002 in many companies and projects as a full-stack developer, architect, release engineer, and team leader. Passionate about DevSecOps, containers, cloud-native, and k8s, he is an AWS Certified Solution Architect, GCP Certified Professional Cloud Architect, and Certified Kubernetes Administrator.