
Uses Bytewax Version 0.9.0
Data processing frameworks are often difficult to write tests for because they generally require a separate set of infrastructure for the tests to run on. One of the benefits of Bytewax’s architecture is that it is straightforward to run as a python script, which it makes it easy to incorporate tests into your development workflow. Tests are important across all software applications, from data pipelines to web applications. For every code change that’s made in your software project, there’s a possibility of introducing a new bug. Despite all your manual efforts, there can still be minor issues that go unchecked. That’s why it’s important to write automated tests.
There are different types of tests you can write to test your new features. The most important and basic one is unit testing. Unit tests help validate the functionality of each new component without affecting others. Any time you add a new feature to your code, creating a unit test is important in order to check if it’s functioning as expected. This can be done by adding both correct and incorrect input conditions.
Unit tests also help improve code quality and detect potential issues. In this article, you’ll learn about Bytewax dataflows and how to write tests for them that run on GitHub Actions.
You can find all the files used in this tutorial in this GitHub repository.
Introduction to Unit Testing
Unit testing is the initial phase of software testing in which individual blocks of code are separately tested. To illustrate some use cases of unit testing, consider the following code block:
def test_function():
    x = 10
    z = 5
    for index in range(y):
        print(index + x)
        x += 1
        # do more with 'index'
    del(x)
    del(y)

    print("Final value of x:")
    print(x)
    del(x)
This is a Python script that calculates a numeric value within a loop by incrementing it with a seed value and a counter. It then prints the value. However, this code has five things wrong:
- Declaring a variable
zthat’s never used (line 3) - Using a variable
ythat hasn’t been declared (line 4) - Deleting the variable
ywhen it was never declared (line 9) - Printing the variable
xafter deleting it (line 12) - Deleting the variable
xeven though it was already deleted (line 13)
Using the wrong variable in code is an easy way to create a bug. Although these errors may seem obvious, it’s not uncommon to see them in code.
Implementing Tests for Bytewax Dataflows with GitHub Actions
Now that you understand the basics of unit testing, we will take a look at how you can test Bytewax dataflows.
Setting Up
There are some prerequisites to use Bytewax. You’ll need the following:
- A GitHub account
- Git installed on your computer
- A Python IDE to write and run your code, such as PyCharm
Once you meet all the prerequisites, you can install Bytewax using pip:
pip install bytewax==0.9.0Running a Simple Bytewax Dataflow
The code snippet below shows a simple dataflow program using Bytewax:
from bytewax import Dataflow, run

def is_odd_number(x):
   return x % 2 == 1

#Bytewax dataflow
flow = Dataflow()
flow.filter(is_odd_number)
flow.capture()

inputData = [(0, 11), (0, 73), (0, 50)]

if __name__ == "__main__":
    for epoch, x in sorted(run(flow,inputData)):
        print(x)
Here, the code iterates over a list of values that are in the inputData array, then each entry is filtered through the function is_odd_number() where it checks for odd numbers, then the data pipeline captures the odd numbers and returns them one by one.
When the code runs, you would get the following results :
================ RESTART: BytewaxSimple.py ==========
11
73
Testing a Bytewax Dataflow
To make sure that your data pipeline will always behave as it should, it’s a good practice to use automated tests that will validate the behavior. Writing proper automated functional tests is the best way to ensure that no one mistakenly changes the behavior of your pipeline when you have many developers pushing and working on the same code. You can run these tests whenever someone pushes a code change to the github repository, and you can add a check that the changes won't be deployed to production if the tests fail.
Python uses a test framework called pytest that allows developers to write different types of software tests. To get started, install it for your project:
pip install pytestOn successful installation, you should be able to start writing tests with it. In order to write a good test, you should follow the arrange, act, assert (AAA) pattern:
- Arrange: first, initialize objects and set variable values to run the test
- Act: next, invoke the function being tested
- Assert: lastly, validate the test result
The code snippet below shows how arrange, act, and assert are used in a basic Python test:
def test_squares():
   # arrange
   number = 8
   # act
   squared = number ** 2

   # assert
   assert squared == 64
Now, you can use the AAA pattern to test the Bytewax dataflow:
from bytewax import Dataflow, run

def is_odd_number(x):
   return x % 2 == 1

#Bytewax dataflow
flow = Dataflow()
flow.filter(is_odd_number)
flow.capture()

def test_run1():
   #arrange
   inputData = [(0, 11), (0, 73), (0, 50)]
   #act by running the bytewax flow
   result = run(flow, inputData)
   # assert
   assert sorted(result) == sorted([(0, 11), (0, 73)])

def test_run2():
   #arrange
   inputData = [(0, 1), (0, 3), (0, 50)]
   #act by running the bytewax flow
   result = run(flow, inputData)
   # assert
   assert sorted(result) == sorted([(0, 1), (0, 3)])

def test_run3():
   #arrange
   inputData = [(0, 12), (0, 72), (0, 5)]
   #act by running the bytewax flow
   result = run(flow, inputData)
   # assert
   assert sorted(result) == sorted([(0, 5)])
The above code tests our odd number Bytewax dataflow. The arrange section defines the data that the test would use to filter data. The act section calls run(), which runs the bytewax data pipeline program and returns a result. Finally, the assert section validates whether the data returned is correct. You have defined three different tests, where each has a different inputData value to test with the Bytewax dataflow.
To run these tests in Python, you can run the following command from the shell prompt, where main.py is the name of the file you want to test:
pytest -v main.pyRunning a Bytewax Dataflow in GitHub
GitHub Actions allows developers to automate building, testing, and deploying code releases from GitHub. In this section, you’ll take a look at how to use GitHub Actions to automate tests for Bytewax. However, before diving in, it’s important to understand a couple of important terms:
- Workflow: This is a file that defines all the deployment steps. Workflows are always located in every project’s
.github/workflows/directory. - Runner: The workflows you create are run on machines called runners. The
runs-oncommand specifies the type of machine you want the code to run on.
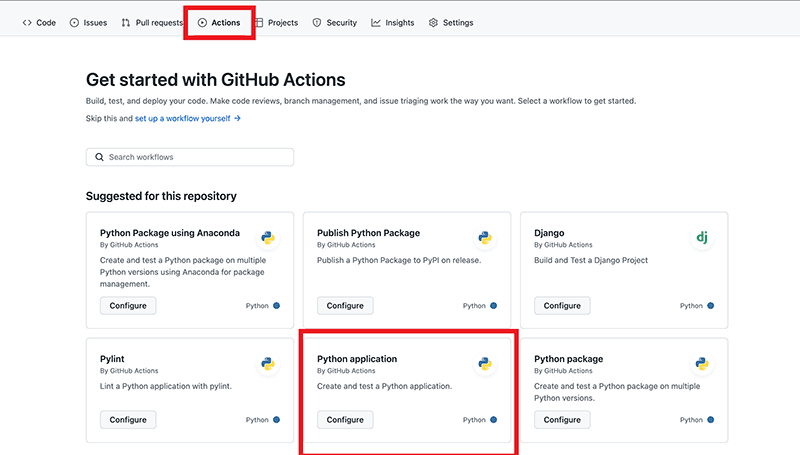
To start running tests with GitHub Actions, begin by creating a GitHub repository (if you don’t already have one) and commit all your project changes there.
Next, click the Actions tab. You should see a list of GitHub Actions suggested for this project. Click Python application:
This will create a new file that you can edit. Once you save the file, it will be saved as .github/workflows/python-app.yml. The file should look like this:
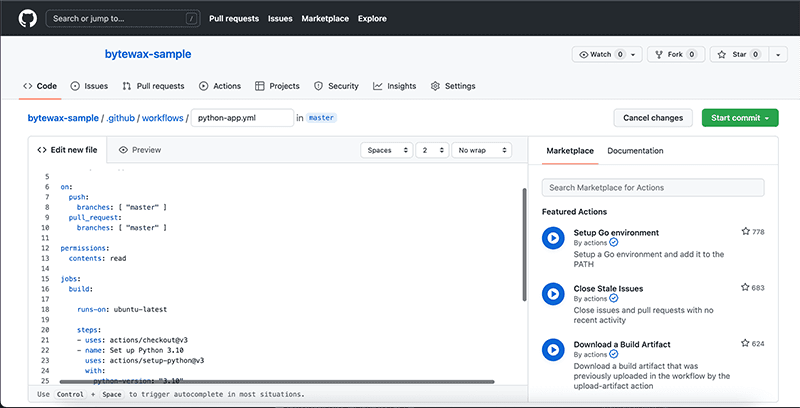
Delete all contents of the file and paste the following block of code into it:
name: Bytewax sample test

on:
  push:
    branches: [ "master", "main" ]

permissions:
  contents: read

jobs:
  build:

    runs-on: ubuntu-latest

    steps:
    - uses: actions/checkout@v3
    - name: Set up Python 3.10
      uses: actions/setup-python@v3
      with:
        python-version: "3.10"
    - name: Install dependencies
      run: |
        python -m pip install --upgrade pip
        pip install bytewax
        pip install pytest
    - name: Test with pytest
      run: |
        pytest -v main.py
Once you save the updated file and commit it to the master branch, the workflow automatically runs, and you can see the results from the Actions tab:
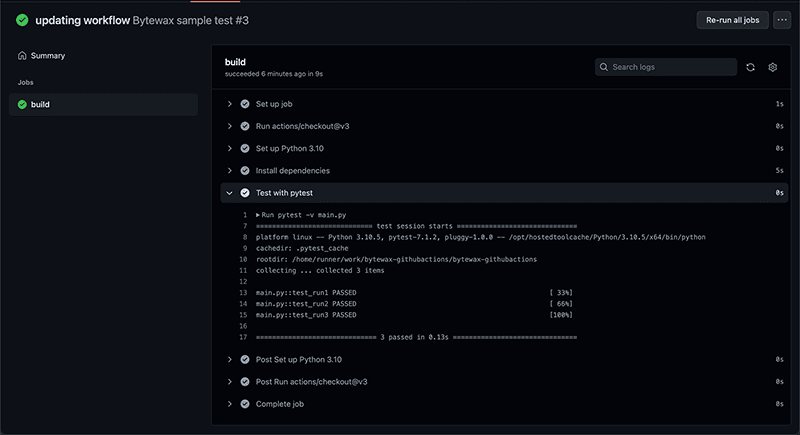
In the image above, the Test with pytest tab is expanded, and you can see that the Bytewax tests have passed.
A more detailed look at the workflow can help you understand what happened here.
The first line states the name of the workflow:
name: Bytewax sample testThen, the on statement specifies the event that would trigger this workflow. In this case, the event is triggered when a new commit is merged into the master or main branch:
on:
  push:
    branches: [ "master", "main" ]
Permission is also granted to the workflow to read contents of the program:
permissions:
  contents: read
Next is the jobs section. This workflow only contains one job, called build, but typical workflows can contain multiple jobs, which execute sequentially. Before listing the steps to run the job, you have to specify the machine, or runner, that the job should run on. This particular workflow specifies that the test will be run on the latest Ubuntu build:
runs-on: ubuntu-latestThe next bit of code adds the actions/checkout@v3 keyword. This helps you check out the repository under $GITHUB_WORKSPACE so that your workflow can have access to it. Then it sets up Python using version 3.10:
- name: Set up Python 3.10
  uses: actions/setup-python@v3
  with:
     python-version: "3.10"
The pip, bytewax, and pytest dependencies are also installed:
- name: Install dependencies
  run: |
    python -m pip install --upgrade pip
    pip install bytewax
    pip install pytest
Finally, once everything is set up, the test is run using pytest:
- name: Test with pytest
  run: |
    Pytest -v main.py
Conclusion
As you build your software, it’s important to incorporate unit testing, which enables you to write and ship code with fewer bugs. In your source code, there will be variables and different kinds of data created and used throughout the lifecycle of the process. One of the nice things about building data pipelines with Bytewax is that it is easy to write test and operate within the same best practices of writing software. Bytewax is an open source Python framework for building scalable dataflows to process any data stream. Learn more about getting started with Bytewax today.
Stay updated with our newsletter
Subscribe and never miss another blog post, announcement, or community event.

Sadequl Hussain
Technical WriterSadequl is a community guest writer.