.png)
Today’s post we are going to cover Change Data Capture (CDC).
it's a real game-”changer” 😛.
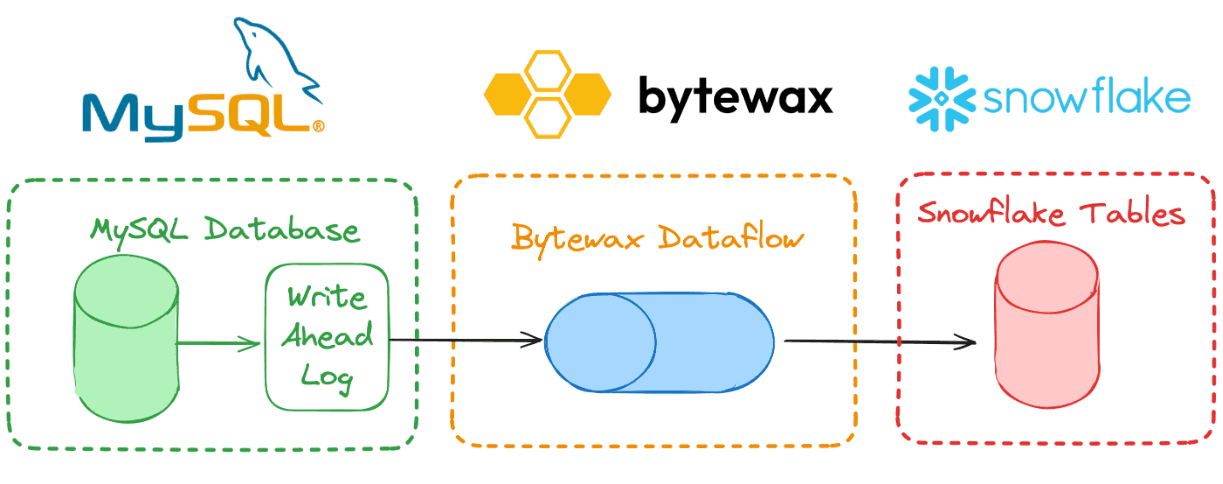
Extremely witty pun aside 😆, CDC can be an extraordinarily useful tool in the world of data. This article is going to break down what CDC is and how you can use the Python stream processor, Bytewax for CDC from MySQL to Snowflake. All in Python! Sounds cool right!?
You’ll learn about how to process the MySQL change stream as well as how you can leverage Snowflakes Table Streams to build an efficient ingestion mechanism.
At the end of the article, you should be comfortable setting up MySQL in docker and configuring it for CDC, building a Bytewax dataflow to process the stream and configuring Snowflake as an output source from our dataflow.
Skip to the code → https://github.com/bytewax/guide-snowflake-cdc-connector
What’s CDC?
Change Data Capture, commonly known as CDC, is a technique used to capture changes made to the data in a database. It identifies and captures insertions, updates, and deletions, providing a comprehensive view of data changes over time. Why Bother with CDC?
CDC sounds boring, but it is crucial for many data systems:
- Migrating Data: Migrating to newer database systems or replicating the database in another physical area for reliability and speed.
- Data Warehousing and ETL: In data warehousing, CDC helps in extracting only the changed data, reducing the load and improving the efficiency of the ETL (Extract, Transform, Load) processes. The alternative is to copy an entire replica of a table every night and determine the differences between the existing table and the new replica.
- Real-Time Data Integration: It enables real-time data integration across different systems, ensuring that all systems are up-to-date.
- Audit and Compliance: CDC provides a historical record of data changes, which is crucial for audit trails and compliance with various regulatory requirements.
- Business Intelligence and Reporting: By having access to the latest data, businesses can make more informed decisions based on real-time insights.
CDC, the details
When data is added, modified or deleted in a transactional database like MySQL or PostgreSQL, you can track the changes made in some way by either reading a log file where the database has recorded what happened, inferring changes via timestamps on the rows, or based on triggers set in the database. The most efficient of these methods is to use the change log. The change log is called the write-ahead or transaction log in most systems. These log files are used for backup and recovery of the database system. The same characteristics that make these files useful in recovery and backup, also make them suitable for replicating the database in another location or system.
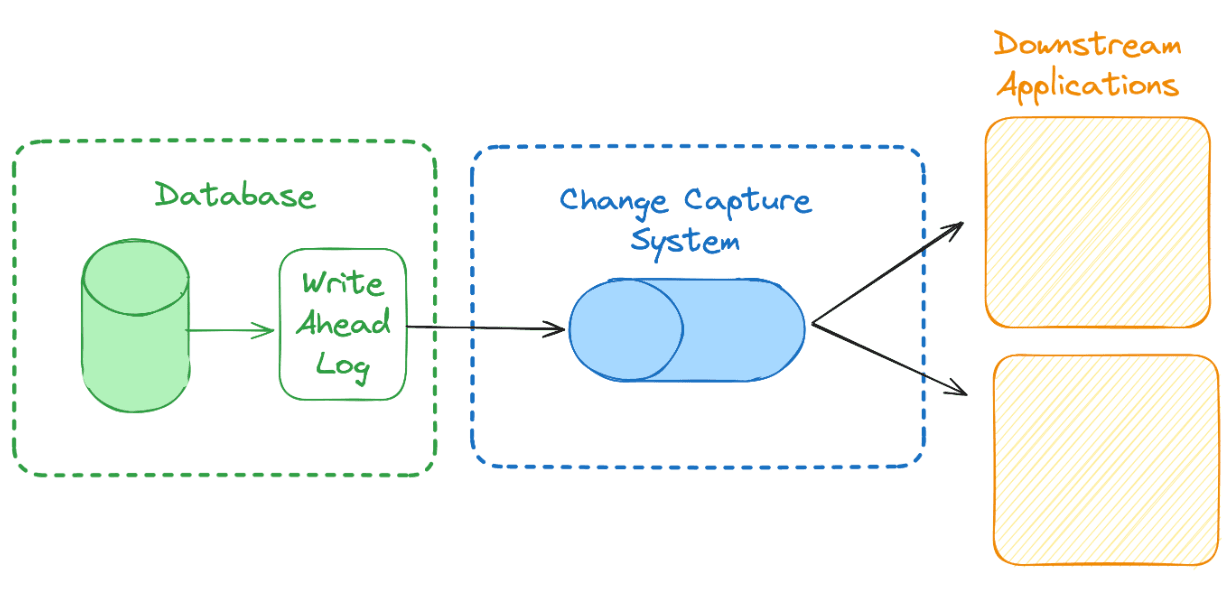
Tools for Managing Change Data
To take advantage of the log for replication, we need to pipe the changes into a streaming system so we can then process them and write them to a new database. Debezium and Kafka are the most common tools used in CDC. Debezium is an open-source tool for Change Data Capture. It connects to your databases, tracks all the changes, and streams these changes to a (Architecture Example). By capturing row-level changes in the databases' transaction logs, Debezium allows for real-time data streaming and analysis. It supports a variety of databases including MySQL, MongoDB, PostgreSQL, and Oracle. Debezium is highly flexible and scalable, making it suitable for large-scale data environments.
CDC in Python?
For this blog post I wanted to keep things simple and in Python, so we are going to pull up a well-loved Python library - python-mysql-replication which will allow us to listen to MySQL database changes in Python.
Setting Up MySQL for CDC
In order to replicate the changes being made in MySQL we will need to configure some privileges and properties of the database. These can be done via startup and in a configuration file. We are going to use docker compose to start MySQL in a docker container. This will allow us to also set up a little administration dashboard to easily view the database and make changes to the table.
version: '3.6'

services:

  db:
    image: mysql
    restart: always
    environment:
    MYSQL_ROOT_PASSWORD: example
    MYSQL_DATABASE: bytewax
    command: --server-id=1 --log-bin=mysql-bin --binlog-format=ROW --binlog_row_image=FULL --binlog_row_metadata=FULL
    volumes:
        - ./init:/docker-entrypoint-initdb.d
    ports:
    - "3306:3306"

  adminer:
    image: adminer
    restart: always
    ports:
    - 8080:8080
The command we use to start MySQL with a binlog is in the command line of the yaml file.
command: --server-id=1 --log-bin=mysql-bin --binlog-format=ROW --binlog_row_image=FULL --binlog_row_metadata=FULL
We will have the full binlog available with all of the table metadata with these settings. This is required so we have the column names as well as row details when we start to consume the binlog using the python mysql replication library.
The additional configuration required is stored in an init file that is mounted by the docker container via the volume command.
volumes:
        - ./init:/docker-entrypoint-initdb.d
And the corresponding init file contains the details of the configuration.
CREATE USER 'replicator'@'%' IDENTIFIED BY 'replicationpassword';
GRANT REPLICATION SLAVE ON *.* TO 'replicator'@'%';
FLUSH PRIVILEGES;
create database bytewax;
use bytewax;
CREATE TABLE trips (
    TRIPID INT PRIMARY KEY,
    DRIVERID INT,
    TIMECOMPLETED TIMESTAMP,
);
This also creates the database and table that we will use for the rest of this example.
Introducing Bytewax
If you are unfamiliar with Bytewax, it is a Python stateful stream processor. Thanks to its versatility and the flexibility offered by its Python-based API it allows the same tool to be used across a diverse set of use cases, which include Change Data Capture (CDC). The adaptable nature of Bytewax's API means it can handle the nuanced demands of CDC, allowing for customized processing of data streams that reflect the unique needs of different database changes. Setting Up Bytewax for CDC.
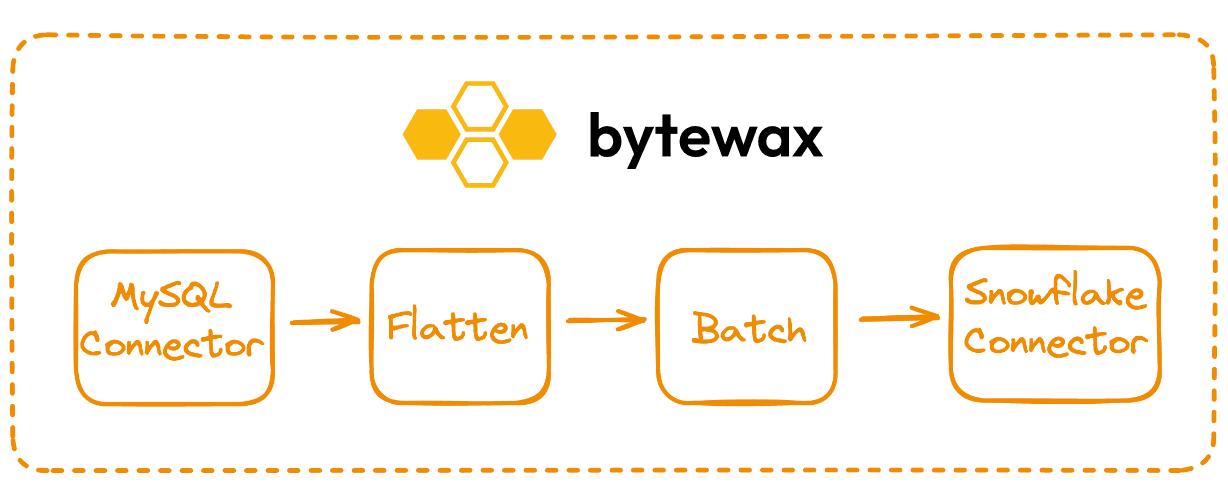
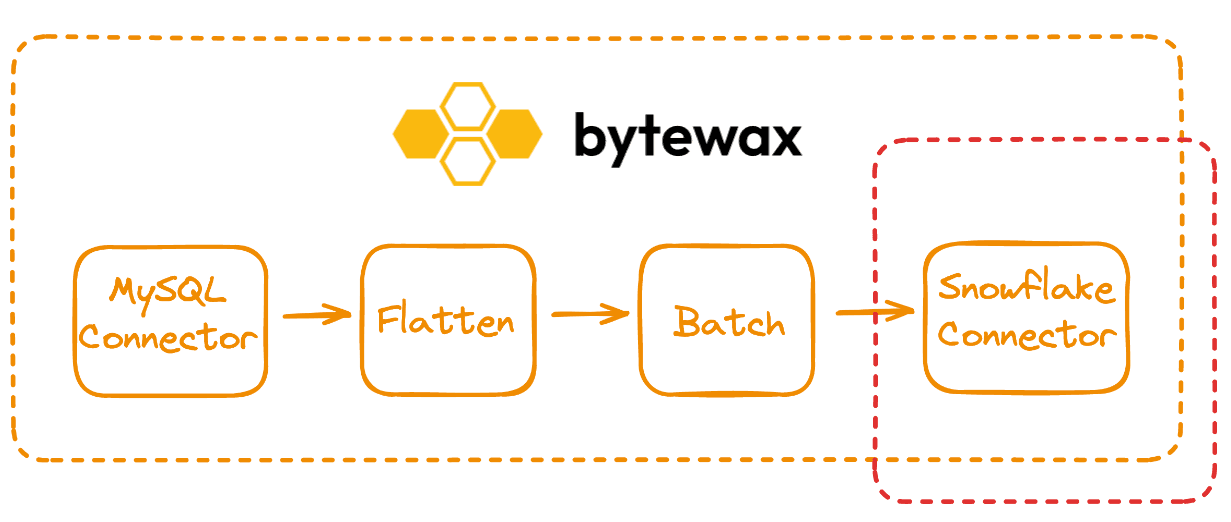
There are 3 key parts to any Bytewax CDC workload:
- A source connection to the change stream from the database or from Kafka or Debezium.
- A transformation layer to modify data as needed.
- A sink connection to the downstream system/application.
Workloads in Bytewax are described as a series of steps organized into a directed graph. These are referred to as dataflows. A dataflow can have multiple inputs, many separate processing steps, it can branch and join together and can have multiple outputs.
Dataflow code
from datetime import timedelta
import os

from bytewax.dataflow import Dataflow
import bytewax.operators as op
from bytewax.operators.helpers import map_dict_value
from connectors.mysql_connector import MySQLBinLogSource
from connectors.snowflake_connector import SnowflakeSink

mysql_settings = {
    "host": "localhost",
    "port": 3306,
    "user": "root",
    "passwd": "example"
}

# Database specific info
SOURCE_TABLE_SCHEMA = {"TRIPID": "INT", "DRIVERID": "VARCHAR", "TIMECOMPLETED": "TIMESTAMP"}
PRIMARY_KEY = "TRIPID"  # unique identifier
DESTINATION_TABLE = "DRIVER_TRIPS"

# Snowflake connection parameters
USER = os.getenv("SNOWSQL_USR")
PASSWORD = os.getenv("SNOWSQL_PASS")
WAREHOUSE = os.getenv("SNOWSQL_WAREHOUSE", "COMPUTE_WH")
ACCOUNT = os.getenv("SNOWSQL_ACCOUNT")
DATABASE = "BYTEWAX"
SCHEMA = "PUBLIC"

flow = Dataflow("snowflake-cdc")
change_stream = op.input("input", flow, MySQLBinLogSource(mysql_settings))
op.inspect("change_stream", change_stream)
change_stream = op.flatten("1-many", change_stream)
batched_stream = op.collect(
    "batch_records", change_stream, timeout=timedelta(seconds=10), max_size=10
)
op.inspect("batched_stream", batched_stream)
op.output(
    "snowflake",
    batched_stream,
    SnowflakeSink(
        USER,
        PASSWORD,
        ACCOUNT,
        WAREHOUSE,
        DATABASE,
        SCHEMA,
        SOURCE_TABLE_SCHEMA,
        PRIMARY_KEY,
        DESTINATION_TABLE,
    ),
)
In our data flow we are connecting to mysql and getting a change stream, this is then flattened as there may be many different row changes from different tables. We can then collect the changes per key, where the key is the table. Those collected changes are used in the Snowflake sink.
MySQL Connector
We imported a class from mysql_connector called MySQLBinLogSource in the dataflow. Let's take a look at how we can use the python-mysql-replication library to write a custom connector that will listen to the changes in the MySQL binlog.
from datetime import datetime
from random import randint
from typing import Iterable, Optional

from pymysqlreplication import BinLogStreamReader
from pymysqlreplication.row_event import DeleteRowsEvent, UpdateRowsEvent, WriteRowsEvent
from bytewax.inputs import FixedPartitionedSource, StatefulSourcePartition


def convert_event_to_dict(schema, table, event):
    events = []
    for row in event.rows:
        print(row)
        if isinstance(event, WriteRowsEvent):
            op_type = 'c'  # Assuming 'c' stands for create/insert
            before_values = None
            after_values = row.get("values", None)
        elif isinstance(event, UpdateRowsEvent):
            op_type = 'u'  # Assuming 'u' stands for update
            before_values = row.get("before_values", None)
            after_values = row.get("after_values", None)
        elif isinstance(event, DeleteRowsEvent):
            op_type = 'd'  # Assuming 'd' stands for delete
            before_values = row.get("values", None)
            after_values = None
        else:
            return None  # Non-row events are not handled

        events.append((f"{schema}:{table}",{
                "before": before_values,
                "after": after_values,
                "op": op_type,
                "ts_ms": event.timestamp * 1000,  # Convert to milliseconds
                "transaction": None,  # We have ignored transaction logic for this example
        }))
    return events


class MySQLBinLogSource(FixedPartitionedSource):
    def __init__(self, mysql_settings):
        self.mysql_settings = mysql_settings

    def list_parts(self):
        return["single-part"]

    def build_part(self, _now, _for_key, _resume_state):
        return MySQLBinLogPartition(self.mysql_settings)

class MySQLBinLogPartition(StatefulSourcePartition):
    def __init__(self, mysql_settings):
        self.stream = BinLogStreamReader(
            connection_settings=mysql_settings,
            server_id= randint(0,10000),  # Server ID must be unique for each replication slave
            only_events=[DeleteRowsEvent, UpdateRowsEvent, WriteRowsEvent],
            blocking=True,
            resume_stream=True
        )

    def next_batch(self) -> Iterable[tuple]:
        binlogevent = self.stream.fetchone()
        if binlogevent is None:
            return []  # or return an appropriate value indicating no events
        schema = binlogevent.schema
        table = binlogevent.table
        batch = convert_event_to_dict(schema, table, binlogevent)
        return [batch]

    def snapshot(self) -> None:
        return None

    def close(self):
        self.stream.close()
In this connector we have written we are ignoring the snapshotting capability that would be used for recovery. The way the connector works is by first establishing a connection to the database with the BinLogStreamReader() class from the python-mysql-replication library. Bytewax will then use this handle to continuously fetch new changes. These are then parsed and formated slightly into a format common from systems like debezium and sent downstream in the dataflow.
Writing a Custom Snowflake CDC Sink
One of the key components in this dataflow is the Snowflake Sink in snowflake_connector.py. This is a bit more complicated than some of the other custom sinks because we are leveraging Snowflakes own internal Table Streams.
Snowflake Table Streams
Snowflake Table Streams are part of how internal table replication works in snowflake. You select a source table and specify a destination table. Snowflake creates a stream that is used internally by Snowflake to replicate snowflake tables. Lucky for us, it is just like a CDC stream 😀. You can read more about streams in the Snowflake documentation.
The snowflake streams are essentially a table with some special information: METADATA$ACTION, METADATA$ISUPDATE. Which allows us to signal if the event in the database was an insert, update or delete. As an example, we can show a list of changes in the table below.
| ID | FIELDA | FIELDB | METADATA$ACTION | METADATA$ISUPDATE |
|---|---|---|---|---|
| 1 | Joe | 90 | INSERT | False |
| 2 | Jane | 90 | INSERT | False |
| 3 | Joe | 60 | INSERT | True |
| 4 | Joe | 0 | DELETE | True |
| 5 | Sally | 0 | INSERT | False |
Joe initially is inserted with a value of 90 and then is updated to 60 before being deleted.
In table replication, this information is then used in conjunction with a merge statement to update the destination table reliably with the metadata in the stream.
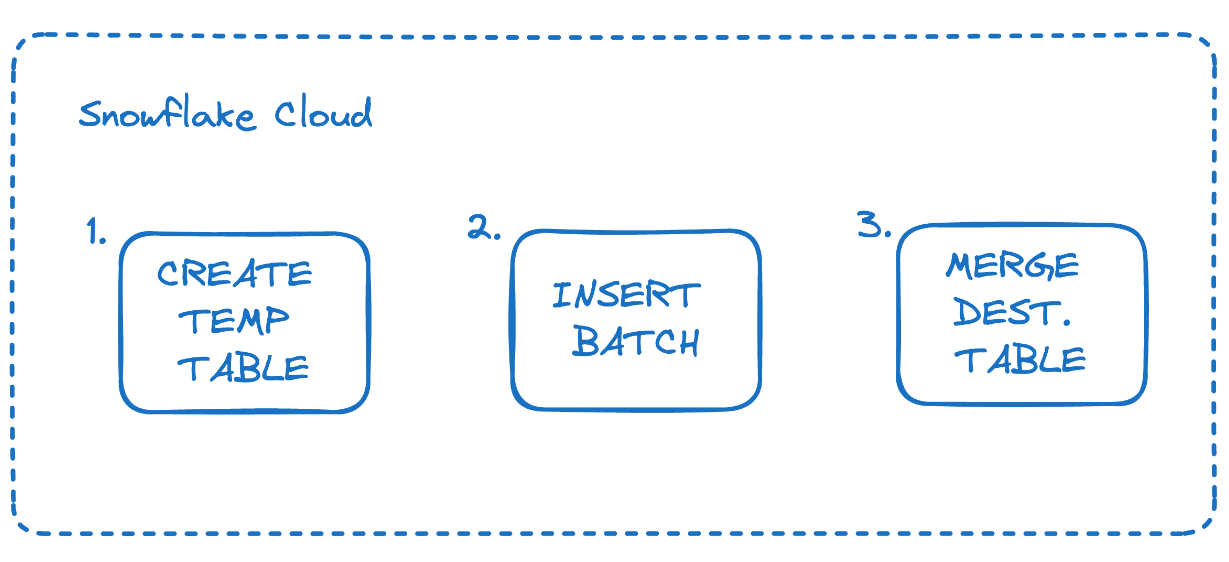
Leveraging Streams in Our Sink
Armed with the knowledge of how Stream and Merges work in Snowflake, we can build on the Stream structure to replicate external sources into Snowflake. It kind of feels like we are hacking Snowflake 🚀. We will make queries against snowflake to make a temporary table mimicking the stream table, insert the batch of rows, and then merge the table with the destination table.
When we initialize a SnowflakeSink object, we will create a connection to Snowflake and create the destination tables based off of the source table schema.
class SnowflakeSink(DynamicSink):
    def __init__(
        self,
        user,
        #...
        self.stream_table_schema = source_table_schema | {
            "METADATA$ISUPDATE": "BOOLEAN",
            "METADATA$ACTION": "VARCHAR",
        }

    def build(self, _step_id, _worker_index, _worker_count):
        return _SnowflakePartition(
            self.user,
            #...
            self.stream_table_schema,
        )


class _SnowflakePartition(StatelessSinkPartition):
    def __init__(
        self,
        user,
        #...
        stream_table_schema,
    ):
        self.conn = snowflake.connector.connect(
            user=user,
            password=password,
            account=account,
            warehouse=warehouse,
            database=database,
            schema=schema,
        )
        self.destination_table = destination_table
        self.destination_table_schema = destination_table_schema
        self.primary_key = primary_key
        self.stream_table_schema = stream_table_schema

        # create destination table if it doesn't exist
        columns__types = ", ".join(
            [
                " ".join(key__value)
                for key__value in self.destination_table_schema.items()
            ]
        )
        create = f"""CREATE TABLE IF NOT EXISTS {self.destination_table} ({columns__types});"""
        self.conn.cursor().execute(create)
And then we can create a temp table that mimics the table stream and write our batch of updates to it. In Bytewax write batch is called for the next available data. This is the collected keyed records we would receive from the collect step of our dataflow.
the write batch code is show below. It will create a temporary table and then merge the temporary table. The code for the create and merge are separate functions also shown below.
    def write_batch(self, batch):
        """Takes the accumulated change data, reduces overwriting statements,
        formats the correct SQL statements and executes them in snowflake.
        """
        key, batch_events = batch[0]
        table_data = {}
        for event in batch_events:
            if event["op"] == "c":
                # create event
                stream_mods = {
                    "METADATA$ISUPDATE": False,
                    "METADATA$ACTION": "INSERT",
                }
                table_data[event["after"][self.primary_key]] = (
                    event["after"] | stream_mods
                )
            elif event["op"] == "u":
                # update event
                stream_mods = {"METADATA$ISUPDATE": True, "METADATA$ACTION": "INSERT"}
                table_data[event["after"][self.primary_key]] = (
                    event["after"] | stream_mods
                )
            elif event["op"] == "d":
                # delete event
                stream_mods = {"METADATA$ISUPDATE": True, "METADATA$ACTION": "DELETE"}
                table_data[event["before"][self.primary_key]] = (
                    event["before"] | stream_mods
                )

        query_string, insert_string = create_temp_table(
            table_data.values(), self.destination_table, self.stream_table_schema
        )
        self.conn.cursor().execute(query_string)
        self.conn.cursor().execute(insert_string)

        merge = merge_table(
            self.destination_table, self.destination_table_schema, self.primary_key
        )
        self.conn.cursor().execute(merge)

        drop = f"""DROP TABLE temp_{self.destination_table}_stream;"""
        self.conn.cursor().execute(drop)
The function to create the temp table.
def create_temp_table(table_data, destination_table, stream_table_schema):
    """Create a temporary stream table statement.

    Arguments:
    table_data - dictionary of change data used to generate the table.
    """
    columns__types = ", ".join(
        [" ".join(key__value) for key__value in stream_table_schema.items()]
    )
    query_string = f"""CREATE OR REPLACE TABLE temp_{destination_table}_stream ({columns__types});\n"""

    columns = ", ".join(stream_table_schema.keys())
    values = ", ".join(
        [
            "(" + ", ".join([f"'{str(row[x])}'" for x in stream_table_schema.keys() ]) + ")"
            for row in table_data
        ]
    )
    insert_string = f"""INSERT INTO temp_{destination_table}_stream ({columns})
                    VALUES {values};""".replace(
        "'None'", "NULL"
    )
    return (query_string, insert_string)
And then in the same write_batch call in Bytewax the merge of our temporary stream with the destination table is called with the merge_table function.
def merge_table(destination_table, destination_table_schema, primary_key):
    """Create a merge statement to match the change
    data to the destination table data.
    """
    insert = ", ".join(destination_table_schema.keys())
    values = ", ".join([f"S.{x}" for x in destination_table_schema.keys()])
    set_keys = list(destination_table_schema.keys())
    set_keys.remove(primary_key)
    set_statement = ", ".join([f"T.{x} = S.{x}" for x in set_keys])
    merge_statement = f"""MERGE into {destination_table} as T
    using (select *
    from temp_{destination_table}_stream) AS S
    ON T.{primary_key} = S.{primary_key}
    when matched AND S.metadata$action = 'INSERT' AND S.metadata$isupdate
    THEN
    update set {set_statement}
    When matched
    And S.metadata$action = 'DELETE' THEN DELETE
    when not matched
    And S.metadata$action = 'INSERT' THEN
    INSERT ({insert})
    VALUES ({values});"""

    return merge_statement
And voila, database changes replicated!
We are doing a little bit of magic with our dataflow. Once we batch the transactions, we compress them if there are, for example, multiple updates and then a delete, we will ignore the updates and send just the delete.
Wrapping up
Companies grow to be a set of disparate data systems and Change Data Capture is a powerful concept offering real-time data synchronization and efficient data tracking for these organizations. This was an example of how you can build a CDC powered system all in Python using open source tools readily available.
If you liked this post, show us some love (with ⭐️) on GitHub.
Batch or streaming processing for IoT data
Zander Matheson
CEO, FounderZander is a seasoned data engineer who has founded and currently helms Bytewax. Zander has worked in the data space since 2014 at Heroku, GitHub, and an NLP startup. Before that, he attended business school at the UT Austin and HEC Paris in Europe.